Shopify merchants running Meta ads average a 2.5 to 4x ROAS across most product niches BUT only when their campaigns are built correctly.
The gap between a profitable Meta ads account and one that bleeds budget comes down to three things:
- the right campaign structure
- feed-quality product data
- and creatives that stop the scroll.
This guide covers everything a Shopify merchant needs to know in 2026 : from account setup to scaling without the fluff.
Whether you’re setting up your first campaign or diagnosing a ROAS plateau, start here.
Ready to skip the manual setup?
Install MyAdForce : free trial, no credit card required. Sets up your full Meta Ads structure from your shopify catalogue in minutes.
Why Meta Ads for Shopify ?
Meta’s advertising platform (Facebook, Instagram, and the Audience Network) remains the highest-ROI paid channel for most Shopify merchants.
Three structural advantages explain why.
1. Native Shopify and Meta catalogue integration
Shopify sends your full product catalogue to Meta automatically.
Every product title, price, image, and availability status is synced.
This is the foundation of Dynamic Product Ads (DPA), which show each visitor the exact product they browsed without manual creative work.
No other ad platform offers this level of Shopify-native integration out of the box.
2. Unmatched audience targeting depth
For cold audience, Meta’s behavioural data is two decades of purchase signals, interests, and engagement patterns which lets Shopify merchants reach buyers who don’t yet know their brand.
Lookalike audiences built from your existing customers consistently outperform interest-based targeting for ecommerce.
3. The DPA advantage
Dynamic Product Ads deliver personalised ads at the product level.
A visitor who viewed your blue running shoes sees that exact product with your current price and not a generic brand ad.
Meta’s own data shows DPA generate a 34% lower cost per purchase than standard static ecommerce ads.
For Shopify stores with more than 20 products, DPA should be running by default.
→ See the full DPA guide: Dynamic Product Ads for Shopify : the complete guide
Account Setup Checklist
Before running any campaign, three technical foundations must be in place.
Skip any of them and your data will be incomplete, your targeting will underperform, and you’ll make budget decisions based on wrong numbers.
1. Meta Business Manager
As a shopify merchant, if you plan to launch some ads on Meta, always operate through a Business Manager.
Never launch your ads with a personal ad account.
You need a clean separation between personnel and business data, that’s why it’s required to create a business manager if you don’t have one yet :
- Go to business.facebook.com and click on “Create your business Manager”
- Create or claim your Ad Account
- Add your Facebook Page, Instagram Account.
2. Meta Pixel + Conversions API (CAPI)
The Pixel alone is not enough in 2026.
After iOS 14, browser-based tracking loses 30–40% of conversion events.
The Conversions API (CAPI) sends purchase data server-to-server from Shopify directly to Meta bypassing browser restrictions.
Always run Pixel and CAPI, both in parallel.
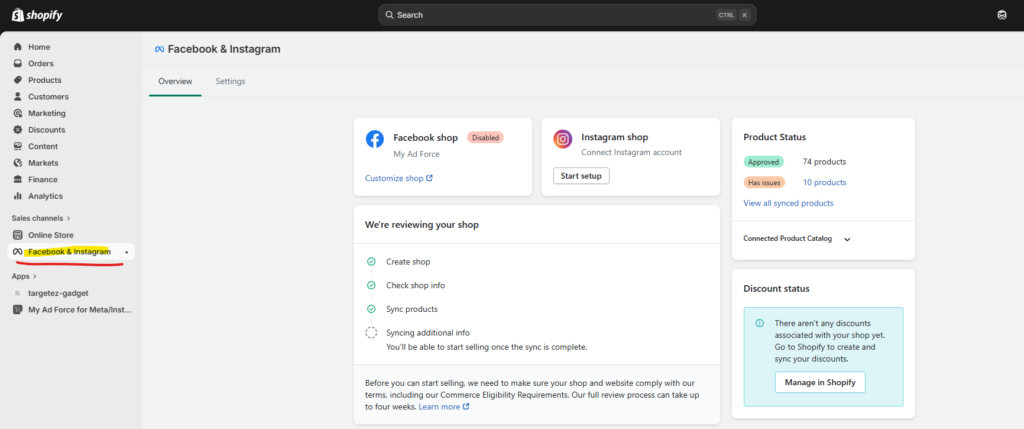
- Install the Meta Pixel via Shopify’s native Meta channel or the Facebook & Instagram app
- Enable the Conversions API via the same integration : Shopify handles the server-side setup automatically
- Verify event deduplication in Events Manager (both Pixel and CAPI should fire; Meta deduplicates them)
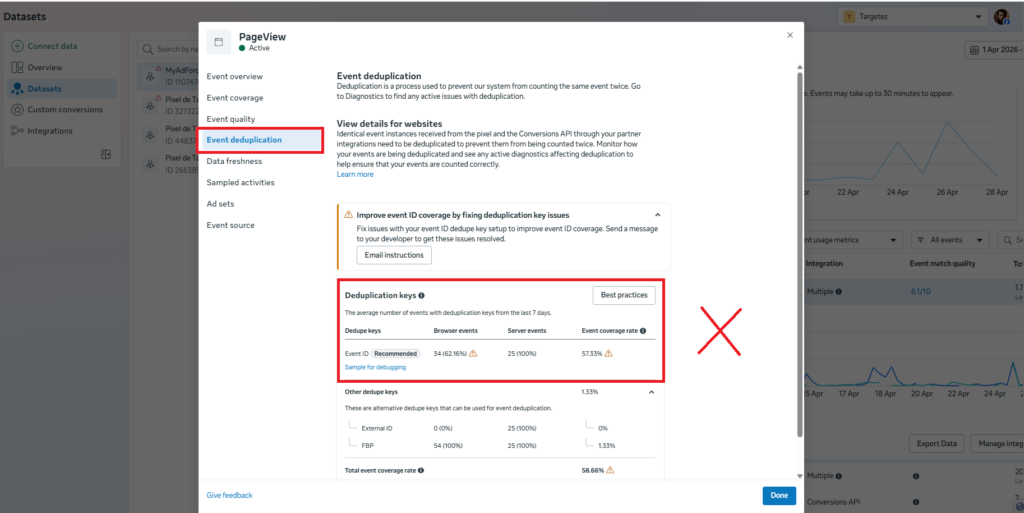
⚠️ Common mistake: Merchants who install only the Pixel and skip CAPI are flying blind on roughly a third of their conversions. This directly causes under-optimisation and wasted budget.
3. Product Catalogue
Your Shopify product catalogue needs to be connected to Meta Commerce Manager before DPA can run.
Shopify’s Meta channel handles this automatically but default feed quality is rarely optimal.
- Connect Shopify to Meta via the Sales Channels → Facebook & Instagram section
- Verify your catalogue in Commerce Manager → Catalogues → Data Sources
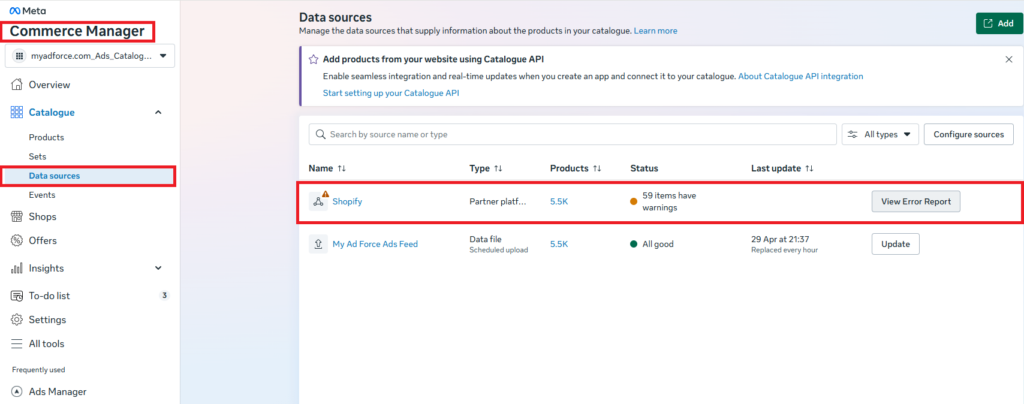
- Fix any disapproved items before launching campaigns
→ Full catalogue setup and optimisation guide: Shopify Product Feed for Meta Ads
The 3 Campaign Types Every Shopify Store Needs
Most of the time, profitable Meta ads accounts for Shopify aren’t built around a single campaign.
The full structure covers three distinct jobs.
Each targeting a different stage of the buyer journey.
| Campaign type | Objective | Audience | When to use |
| Prospecting | Find new buyers | Lookalikes, broad | Always-on |
| Retargeting | Re-engage visitors | Cart, product viewers | Always-on |
| DPA | Show exact product seen | Dynamic, auto-built | Large catalogues |
1. Prospecting or finding new buyers
Prospecting campaigns target people who have never interacted with your brand.
The best-performing cold audience for most Shopify stores is a 1% lookalike of your existing purchasers. Meta finds users who share behavioural patterns with people who already bought from you.
- Objective: Sales (optimise for Purchase)
- Audience: 1% purchaser lookalike, or broad targeting with Advantage+ audience
- Budget: ~60–70% of total ad spend
- Creative: product-focused, angle-driven, value proposition clear
→ Deep dive: Lookalike audiences for Shopify
In case you shop is new or you don’t have so much orders, you can start with interest audience based on your store niche.
2. Retargeting or re-engaging warm visitors
Retargeting campaigns show ads to people who visited your site, viewed products, or added to cart but didn’t purchase.
These are your warmest audiences and typically deliver the lowest cost per purchase in your ad account.
- Objective: Sales (Purchase)
- Audience: Product page viewers (7 days), Add to Cart (7 days), Checkout initiated (14 days)
- Budget: ~20–30% of total ad spend
- Creative: urgency-driven, social proof, specific product or category
→ Deep dive: Facebook retargeting strategy for Shopify
3. Dynamic Product Ads = your always-on catalogue machine
DPA automatically shows each visitor the exact product they viewed, from your Shopify catalogue.
Once set up, the campaign requires minimal creative management because Meta handles personalisation dynamically.
For stores with large catalogues, DPA often become the single highest-ROAS campaign type in the account.
- Objective: Catalogue Sales
- Audience: Broad DPA (prospecting) + Retargeting DPA (viewers and cart)
- Budget: 20–30% of total ad spend (higher if catalogue > 50 products)
→ Full DPA guide: Dynamic Product Ads for Shopify
⚡ MyAdForce implements all three campaign types automatically — prospecting, retargeting, and DPA — directly from your Shopify product catalogue. Install free →
Ad Creative Fundamentals
Meta’s own research attributes roughly 70% of ad performance variance to creative quality and not targeting.
Getting your campaign structure right is necessary but not sufficient.
The creative is the multiplier.
What makes a Shopify ad convert?
Three elements work together in every high-performing ecommerce ad:
- Hook (first 3 seconds): stops the scroll and creates a reason to keep watching or reading. The hook must be relevant to the viewer’s situation and not only just to your product.
- Angle: is the specific reason to buy. Problem/solution, social proof, transformation, direct offer, or curiosity. Each product can be sold through multiple angles; testing angles is the highest-leverage creative activity.
- Offer clarity: the viewer must understand immediately what they’re buying, what it costs, and why they should act now. Ambiguous offers kill conversion rates.
For DPA specifically, the creative layer includes the product image overlay.
Plain white-background product photos perform, but adding a price badge, trust signal (“Free shipping”), or seasonal banner (“Black Friday -30%”) to your catalogue images consistently improves CTR.
→ Full creative guide: Facebook Ad Creatives for Ecommerce
→ Ad angle generator for Shopify [Tool link]
How to Measure ROI on Meta Ads for Shopify
The three metrics every Shopify merchant needs to track (and understand) before making any budget decision:
ROAS (Return on Ad Spend)
ROAS = Revenue from ads ÷ Ad spend.
A ROAS of 3.0× means every £1 or $1 spent returns £3 or $3 in revenue.
Ads Manager ROAS is not your real ROAS because it overcounts due to view-through attribution and undercounts due to iOS 14 signal loss.
Use this Key Performance Indicator as a directional metric, not an absolute truth.
MER (Marketing Efficiency Ratio)
MER = Total revenue ÷ Total ad spend (across all channels).
This is your real business metric.
A store with a 2.8× ROAS in Meta Ads Manager but a 1.6× MER has a profitability problem because other channel costs or attribution overlap are eating the margin.
CPP (Cost Per Purchase)
CPP = Ad spend ÷ Number of purchases.
More stable than ROAS because it doesn’t fluctuate with average order value.
Useful for comparing performance across campaigns targeting different product categories or price points.
💡 2026 benchmark: A healthy ROAS for Shopify ecommerce across most niches sits between 2.5× and 4.5×. Break-even ROAS depends on your margin structure : calculate yours before setting targets.
Post-iOS 14, attribution windows have been reduced and browser-based tracking has degraded.
Comparing periods before and after iOS 14 changes is misleading.
Use a consistent attribution window (7-day click / 1-day view) and triangulate Ads Manager data with Shopify’s own order data.
What good ROAS looks like in practice
Two anonymised accounts from different niches and both using the three-campaign structure described above.
📦 Case Study A in Home & Living niche with 340 SKUs

Starting point: single prospecting campaign, no DPA, no retargeting. Pixel only (no CAPI). Ads Manager showing 2.1× ROAS.

Changes made: Added CAPI → set up DPA catalogue campaign → launched retargeting (cart + viewers) → split budget 65/25/10.

Result after 60 days: Ads Manager ROAS 3.8× / CPP down 38% / DPA alone responsible for 41% of Meta-attributed revenue.

Key insight: the DPA campaign had zero setup cost after catalogue was connected as it ran on existing product data.
📦 Case Study B for a brand of Skincare with 28 SKUs

Starting point: three campaigns running but all targeting the same broad audience. ROAS plateaued at 2.4× for four months.

Changes made: Consolidated to one prospecting campaign (1% purchaser lookalike) + one retargeting campaign (14-day window, cart + PDP viewers). Introduced angle testing: problem/solution vs transformation.

Result after 45 days: ROAS 3.6x / CPP down 29% / transformation angle outperformed problem/solution 2.1× on CTR.

Key insight: audience cannibalisation between the three original campaigns was suppressing performance across all three.
→ Benchmark: Facebook Ads ROAS benchmark for ecommerce
→ Calculate yours: Meta Ads ROAS calculator
Budgeting and Scaling
Starting budget
There is no universal minimum, but Meta’s algorithm needs enough conversion events to optimise effectively.
The practical floor for a Shopify store launching its first campaign is $20–30/day.
Below that, the campaign won’t generate enough purchase data for Meta to learn who to target.
A useful starting framework is to distribute budget across the three campaign types:
- Prospecting (lookalike/broad): 60–70% of budget
- Retargeting (cart, viewers): 20–30% of budget
- DPA (catalogue): 10–20% of budget (increase as catalogue size grows)
When and how to scale
Scale when: your CPP is consistently below target for 7+ days, your frequency is below 2.5 on prospecting, and you have creative variations ready to deploy (fatigue kills scaling campaigns faster than budget increases).
- Vertical scaling (increasing budget on a winning campaign): increase by no more than 20% every 3–4 days. Larger jumps reset the learning phase.
- Horizontal scaling: duplicate the winning ad set with a new audience segment rather than increasing budget on the original. Preserves performance while expanding reach.
→ Deep dive: How to scale Meta Ads for Shopify
→ Budget calculator: Shopify Meta Ads budget calculator
Why Automation Matters at Scale
Managing Meta ads for a Shopify store manually takes times!
You have to handle the catalogue syncing, campaign structure, copy generation, creative rotation, budget rules.
All this can easily take 8–15 hours per week for a 5,000-product catalogue. For most Shopify merchants, that time is not available.
The four highest-effort, most error-prone manual tasks in a Shopify Meta ads account:
- Keeping product catalogue in sync with Shopify inventory and prices in real time
- Generating ad copy variants for each product or category
- Setting up and maintaining the three-campaign structure across prospecting, retargeting, and DPA
- Applying creative updates (seasonal overlays, promotional banners) across hundreds of product images simultaneously
MyAdForce handles all four. It reads your Shopify product feed in real time, generates ad copy from your product data, builds the full campaign structure (prospecting, retargeting, DPA).
And with the upcoming feature of DPA image template designer, lets you apply seasonal overlays to your entire catalogue in one click, with campaigns relaunching automatically.
⚡ Install MyAdForce (free trial). Your full Meta ads structure, built from your Shopify catalogue, in under 5 minutes.
The 6 Mistakes That Kill Your Shopify ROAS on Meta
These six mistakes account for the majority of underperforming Shopify Meta ad accounts.
Each one is fixable and each one has a dedicated guide to go deeper.
1. No Conversions API (CAPI)
Impact: Up to 40% of conversions go untracked post-iOS 14. Meta optimises on incomplete data which will make your CPP rises and your ROAS falls.
Fix: Install CAPI via Shopify’s native Meta channel. It takes under 10 minutes and immediately improves signal quality.
→ Account setup checklist above.
2. No Dynamic Product Ads
Impact: You’re leaving your highest-ROI format on the table. Static campaigns show the same creative to everyone; DPA shows each visitor the exact product they already looked at.
Fix: Connect your Shopify catalogue to Meta and launch a catalogue campaign.
→ Read Dynamic Product Ads for Shopify
3. Wrong attribution window
Impact: Using a 1-day click window on a high-consideration product (homewear, skincare) will make your best campaigns look unprofitable. You’ll cut them.
Fix: Use 7-day click / 1-day view as your baseline.
Cross-reference with Shopify’s own order data to calibrate.
4. Static creative only
Impact: A single creative fatigues in 2–3 weeks. Frequency climbs, CTR drops, CPP rises. Most merchants don’t notice until the damage is done.
Fix: Rotate creative every 2–4 weeks. Test at the angle level first, not the image level.
→ Read Facebook Ad Creatives for Ecommerce
5. No retargeting campaigns
Impact: Cart abandoners and product viewers are your warmest audience it’s typically 3–5× cheaper to convert than cold traffic.
Running no retargeting means you’re paying to acquire an audience and then ignoring it.
Fix: Set up a retargeting campaign with cart (7 days) and product viewers (7 days) as separate ad sets.
→ Facebook retargeting strategy for Shopify
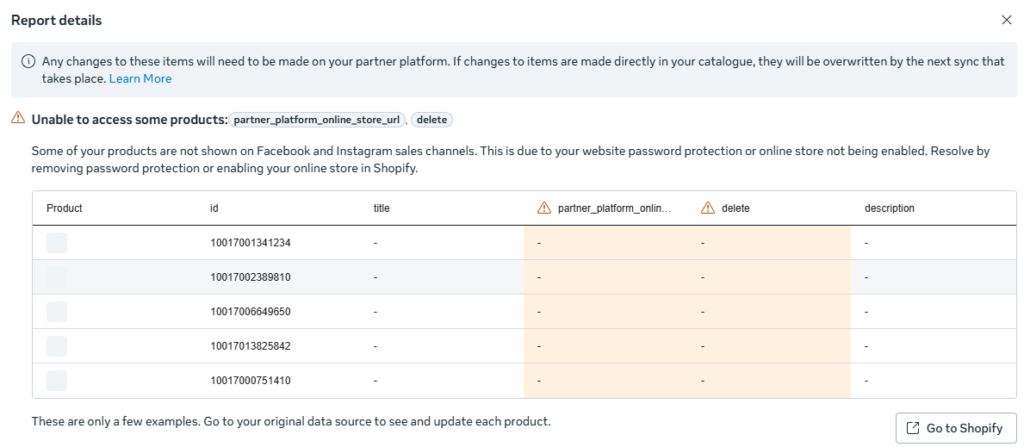
6. Ignoring feed quality
Impact: DPA performance is directly limited by your catalogue data. Wrong prices, missing GTINs, disapproved images, and out-of-stock products all degrade delivery.
Fix: Audit your catalogue in Commerce Manager → Diagnostics.
Fix disapproved items before scaling.
→ Shopify Product Feed for Meta Ads
What to Do Next
Meta ads for Shopify in 2026 reward merchants who get the foundations right: a clean account structure, server-side tracking (CAPI), a healthy product feed, and a systematic approach to creative.
The full guide breaks down into four pillars:
- Pillar 1 (this guide): Campaign structure, ROI measurement, budgeting, and scaling
- Pillar 2: Ad creative strategy : angles, hooks, UGC, and creative testing
- Pillar 3: Dynamic Product Ads : setup, optimisation, and retargeting
- Pillar 4: Shopify product feed : optimisation, errors, and real-time sync
First, use the checklist below to audit your current setup and then follow the links to go deeper on each area.
Ready to skip the manual setup?
Install MyAdForce : free trial, no credit card required. Sets up your full Meta Ads structure from your shopify catalogue in minutes.
Quick-Start Checklist: Meta Ads for Shopify
Use this before launching or auditing any campaign. Each item links to the relevant section or guide above.
Print or copy this list. Check each box before going live.
🔧  TECHNICAL FOUNDATIONS
☐  Meta Business Manager created (not personal ad account)
☐  Meta Pixel installed via Shopify Facebook & Instagram app
☐  Conversions API (CAPI) active (go to Events Manager to verify )
☐  Event deduplication confirmed (Pixel + CAPI both firing)
☐  Domain verification complete in Business Manager
☐  Shopify catalogue connected to Meta Commerce Manager
☐  Catalogue diagnostics checked with zero disapproved items


📊  CAMPAIGN STRUCTURE

☐  Prospecting campaign live (1% lookalike or broad with around 60–70% of budget)
☐  Retargeting campaign live (cart + product viewers with 20–30% of budget)
☐  DPA catalogue campaign live (Catalogue Sales objective with 10–20% of budget)
☐  Campaign objective set to Purchase (not Traffic or Awareness)
☐  Attribution window: 7-day click / 1-day view
☐  Audience exclusions set (recent purchasers excluded from prospecting)

🎨  Ad CREATIVE

☐  At least 2 creative angles live per ad set
☐  Hook tested (question, bold claim, or social proof format)
☐  DPA product images reviewed with no blurry or cropped images
☐  Creative rotation scheduled (every 2–4 weeks)
☐  Ad copy generated for each product or category

💰  BUDGET & MEASUREMENT

☐  Minimum $20–30/day total budget in learning phase
☐  Break-even ROAS calculated (based on your actual margins)
☐  Shopify order data cross-referenced with Ads Manager ROAS
☐  Budget scaling rule applied: max +20% per 3–4 days
Leave a Reply